Frequently Asked Question
How to Turn Your Windows PC Into a Wi-Fi Hotspot
Last Updated 6 years ago
If you’re running Windows 10 with Update installed, then you’re in luck. With that update, Windows now has a single switch for turning any PC with Wi-Fi into a hotspot, and it doesn’t matter whether the Internet connection you want to share is wired or wireless.
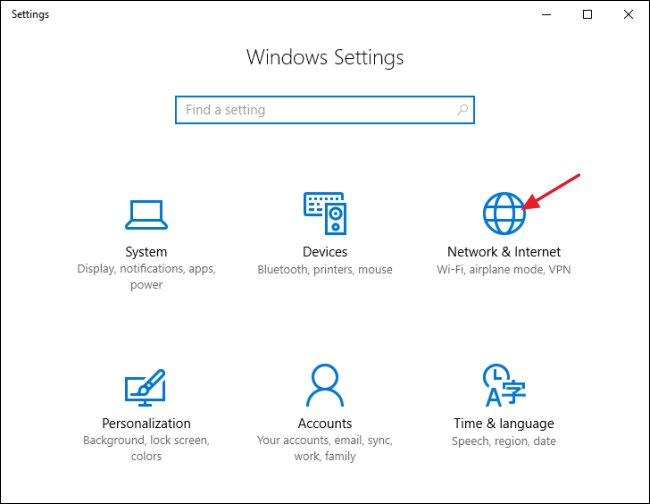
First, fire up Settings by pressing Windows+I on your keyboard. On the main Settings page, click “Network & Internet.”

On the Network & Internet page, on the left-hand side, click “Mobile hotspot.”

On the right-hand side, turn on the “Share my Internet connection with other devices” switch. If you want something other than the default network name and password, click the “Edit” button.

In the Edit window, type whatever network name and password you want to use and then click “OK.”

And that’s all you really have to do in Windows 10. It’s one of the best new features of the Windows 10 Anniversary Update, even though it rolled out with relatively little fanfare.
Note that when you set up an ad-hoc network using your PC’s Wi-Fi, it will disable any existing connection that uses that Wi-Fi adapter. That’s why this method only works if your internet is coming from an Ethernet source.
If you’ve never set up a network like this, be sure to read our full guide to sharing an Internet connection through an ad-hoc network. In short, though, you’ll open the Manage Wireless Networks window (you can find it by opening start and searching for “wireless”), click the Add button, and then click “Create an ad hoc network”. Enter a name and passphrase for the network and it’ll appear in the list of wireless networks. Select it and your laptop will disconnect from its current Wi-Fi network and start hosting an ad-hoc network your other devices can connect to.

Be sure to enable the “Allow other network users to connect through this computer’s Internet connection” checkbox so that your PC will share its wired Internet connection with the devices connected to your PC over the ad-hoc network.

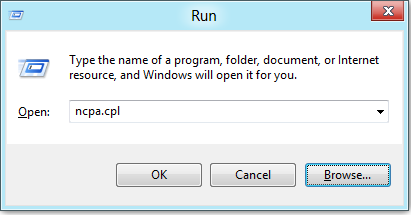
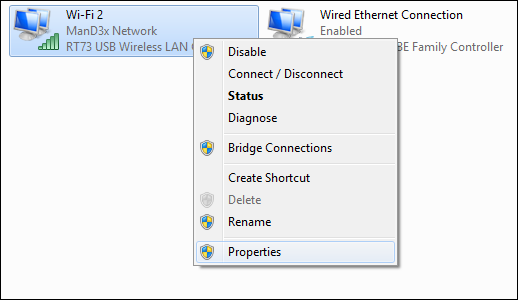
First, you’ll need to make sure your existing wireless network is shared with other network users. Press Windows+R on your keyboard to open the Run dialog box, type “ncpa.cpl”, and then hit Enter.
In the network connections window, right-click your Wireless network and select “Properties” from the context menu.

Switch over to the “Sharing” tab and enable the “Allow other network users to connect through this computer’s Internet connection” checkbox. Go ahead and clear the “Allow other network users to control or disable the shared Internet connection” checkbox while you’re at it and then click the “OK” button.

Next, you’ll need to launch the Command Prompt with administrative privileges. Right-click in the bottom left of your screen (or hit Windows+X) and then select “Command Prompt (Admin)” on the Power Users menu that appears.
Note: If you see PowerShell instead of Command Prompt on the Power Users menu, that’s a switch that came about with the Creators Update for Windows 10. It’s very easy to switch back to showing the Command Prompt on the Power Users menu if you want, or you can give PowerShell a try. You can do pretty much everything in PowerShell that you can do in Command Prompt, plus a lot of other useful things.
With the command prompt open, your next step is to set up the wireless network using the netsh like so:
netsh wlan set hostednetwork mode=allow ssid="" key=""Where

Next, you’ll start broadcasting our network with the following command:
netsh wlan start hostednetwork
And at any time, you can use this last command to show information about the connection. It lists things like the channel your connection uses, ssid name, authentication type, radio type, and the number of clients connected to your network.
netsh wlan show hostednetwork

When you’re done, you should be able to connect any Wi-Fi device to your new ad-hoc network.
First, fire up Settings by pressing Windows+I on your keyboard. On the main Settings page, click “Network & Internet.”
On the Network & Internet page, on the left-hand side, click “Mobile hotspot.”

On the right-hand side, turn on the “Share my Internet connection with other devices” switch. If you want something other than the default network name and password, click the “Edit” button.

In the Edit window, type whatever network name and password you want to use and then click “OK.”

And that’s all you really have to do in Windows 10. It’s one of the best new features of the Windows 10 Anniversary Update, even though it rolled out with relatively little fanfare.
Share a Wired Internet Connection in Windows 7
The ability to share your PC’s wired Internet connection to wireless devices is integrated into Windows 7’s networking interface through something called an ad-hoc network. An ad-hoc network is really just a simple, direct network connection between devices. In this case, you’ll be creating an ad-hoc network between your PC’s wireless connection and any wireless devices you want to connect. You just need to make sure that your wired connection is set up and that the PC does have Wi-Fi available.Note that when you set up an ad-hoc network using your PC’s Wi-Fi, it will disable any existing connection that uses that Wi-Fi adapter. That’s why this method only works if your internet is coming from an Ethernet source.
If you’ve never set up a network like this, be sure to read our full guide to sharing an Internet connection through an ad-hoc network. In short, though, you’ll open the Manage Wireless Networks window (you can find it by opening start and searching for “wireless”), click the Add button, and then click “Create an ad hoc network”. Enter a name and passphrase for the network and it’ll appear in the list of wireless networks. Select it and your laptop will disconnect from its current Wi-Fi network and start hosting an ad-hoc network your other devices can connect to.

Be sure to enable the “Allow other network users to connect through this computer’s Internet connection” checkbox so that your PC will share its wired Internet connection with the devices connected to your PC over the ad-hoc network.

Share a Wired Internet Connection in Windows 8
Unfortunately, Windows 8 stripped away the graphical interface for setting up an ad-hoc network, so it’s not quite as easy to set up as it is in Windows 7 or 10. The underlying feature is still present, though. You just have to resort to a little command line trickery.First, you’ll need to make sure your existing wireless network is shared with other network users. Press Windows+R on your keyboard to open the Run dialog box, type “ncpa.cpl”, and then hit Enter.
In the network connections window, right-click your Wireless network and select “Properties” from the context menu.
Switch over to the “Sharing” tab and enable the “Allow other network users to connect through this computer’s Internet connection” checkbox. Go ahead and clear the “Allow other network users to control or disable the shared Internet connection” checkbox while you’re at it and then click the “OK” button.
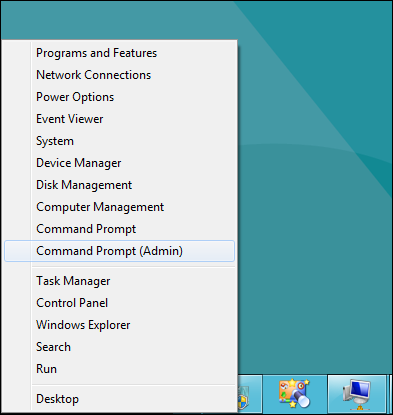
Next, you’ll need to launch the Command Prompt with administrative privileges. Right-click in the bottom left of your screen (or hit Windows+X) and then select “Command Prompt (Admin)” on the Power Users menu that appears.
Note: If you see PowerShell instead of Command Prompt on the Power Users menu, that’s a switch that came about with the Creators Update for Windows 10. It’s very easy to switch back to showing the Command Prompt on the Power Users menu if you want, or you can give PowerShell a try. You can do pretty much everything in PowerShell that you can do in Command Prompt, plus a lot of other useful things.
With the command prompt open, your next step is to set up the wireless network using the netsh like so:
netsh wlan set hostednetwork mode=allow ssid="" key=""Where
<SSID> is the name of your network and <PASSWORD> is the password you want users to connect with. The access point is created with WPA2-PSK (AES) encryption.
Next, you’ll start broadcasting our network with the following command:
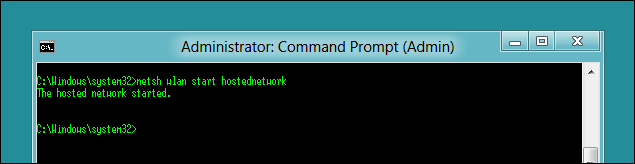
netsh wlan start hostednetwork
And at any time, you can use this last command to show information about the connection. It lists things like the channel your connection uses, ssid name, authentication type, radio type, and the number of clients connected to your network.
netsh wlan show hostednetwork
When you’re done, you should be able to connect any Wi-Fi device to your new ad-hoc network.