Frequently Asked Question
Save Images from MS Word Document
Last Updated 6 years ago
Microsoft Word is the world’s most popular word processing software. It offers you a great number of features that would fulfill all your requirements of creating and managing a document. However, a few small things are still missing from MS Word.
We all sometimes get Word documents that contain a large number of embedded images. If we need all these images saved as separate files, MS World does not provide any straightforward method to do this. Although MS Word itself can do a number of image editing operations within the document but if we want to edit the embedded images in something like Photoshop, we would require images to be saved as separate files.
The Best Method
If you want to save one or few pictures from an MS Word document, you can take right click on the image and select “Save as Picture…” option. This feature has been made available in the recent versions of MS Word. But what if you have 200 images in the document?
The quickest and easiest method of saving all the images from a Word document is to save the document as a webpage. If you know HTML programming, you would understand that a webpage refers to resources like images stored as individual files. So, when we save a Word document as webpage, MS Word document becomes an HTML page and all the embedded images get stored in a separate folder.
We can use this operation to get images out of the Word document.

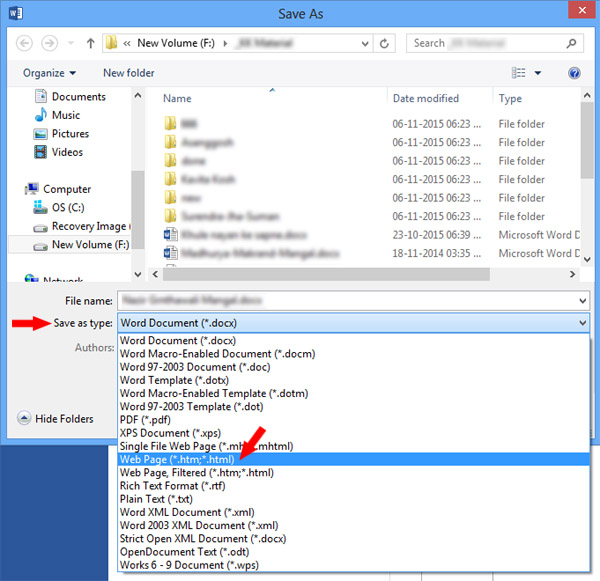
Save an MS-Word document as webpage.
This method is useful if you need to save only one or few images as separate files. If the MS Word document contains lots of images and you want to save them all, then the above given method is best.
Our tips on MS-Word make your life easier and increase your productivity at work.
OK, so this alternative method entails taking a screenshot.
We all sometimes get Word documents that contain a large number of embedded images. If we need all these images saved as separate files, MS World does not provide any straightforward method to do this. Although MS Word itself can do a number of image editing operations within the document but if we want to edit the embedded images in something like Photoshop, we would require images to be saved as separate files.
The Best Method
If you want to save one or few pictures from an MS Word document, you can take right click on the image and select “Save as Picture…” option. This feature has been made available in the recent versions of MS Word. But what if you have 200 images in the document?
The quickest and easiest method of saving all the images from a Word document is to save the document as a webpage. If you know HTML programming, you would understand that a webpage refers to resources like images stored as individual files. So, when we save a Word document as webpage, MS Word document becomes an HTML page and all the embedded images get stored in a separate folder.
We can use this operation to get images out of the Word document.
- Open the MS Word document containing images
- Go to File and then select Save As
- Save As dialog box will appear
- Select Web Page from Save as type list
- Click Save button to save the document as a webpage
- Open Windows Explorer and browse to the location where you have saved the document as webpage.
- In this location, you will find a newly created folder with the same name as that of the MS Word document. This folder will contain all the images that were there in the document. There might be some other files as well, but you can ignore them.
- You’ve got the images as files. Now you can use or edit them separately.

Save an MS-Word document as webpage.
This method is useful if you need to save only one or few images as separate files. If the MS Word document contains lots of images and you want to save them all, then the above given method is best.
Our tips on MS-Word make your life easier and increase your productivity at work.
OK, so this alternative method entails taking a screenshot.
- Open the document that contains the image.
- Scroll to the point so that the entire image is visible on your screen.
- Press Print Scrn key on your keyboard. This will copy the screen’s contents into computer’s memory.
- Open an image editing tool, like Photoshop. Create a new canvas and press Ctrl + V to paste the memory content.
- You may need to crop the the image in order to discard the rest of the screen content. Once that is done, save your image as a JPEG or in other formats as you like.