Frequently Asked Question
Format a Write Protected USB Pendrive
Last Updated 6 years ago
The drive won’t even allow you to reformat it, and there’s no apparent switch for enabling or disabling write protection. Puzzled? Here’s how to format your write protected USB pendrive and start using it again.
Windows has a built-in disk partition management tool called Diskpart. You can open this by hitting Windows key + R, entering cmd, then hitting Enter.
User Access Control will prompt you to confirm the action. Click Yes to continue.
You should now see CMD, the command line tool. At the prompt, enter
The resulting table will list the currently available devices. But which is your USB drive?
Disk 0 will be your computer’s system drive. This is the one that Windows is installed on. If you have multiple partitions, these will be sequentially numbered. Note that the size is displayed for each disk.
With a USB flash device connected, (which will be Disk 1 or higher) you should be able to identify it by its comparatively low capacity.
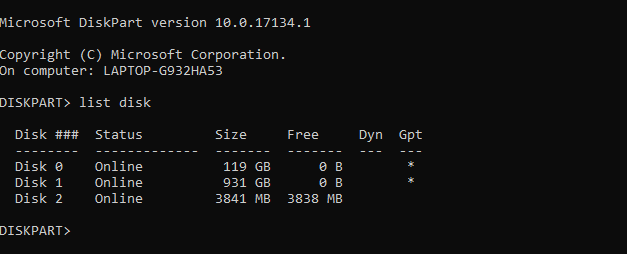
In the image above, while Disk 0 is 119GB and Disk 1 931GB (two partitions of the same drive), Disk 2 is 16GB.
Therefore, Disk 2 is the USB flash drive. You should be able to check the capacity on the device itself, as this is usually printed on a drive’s casing. If not, you’ll be able to confirm it in Windows Explorer.
Once you’re certain, it’s time to select the disk. In our example, that means entering
Various information will be displayed. Check the first line. This is the Current Read-only State. If you’re unable to write to the disk or reformat it, then Current Read-only State will be set to Yes.
You can easily remove the write protection on your pendrive with the command
If successful confirmation of the step will be displayed with the message “Disk attributes cleared successfully.”

Happy to lose the data on the USB flash drive? You can format the drive using diskpart’s clean command. First, ensure the disk is selected:
You can then create and format a partition:
Wait for this to complete—you should now have a fully working and formatted USB flash drive!
Check the write-only status of the drive by copying a small file.
Number one on your list should be the SD Formatter tool from the SD Association. Although clearly intended for SD cards, the tool is compatible with USB flash sticks. After all, A USB flash stick is basically an SD card wired to a USB interface.
Simply connect the device, select the drive and a formatting option, and click Format.
Download: SDFormatter (Free)
Note that this has a slightly archaic method of installation. After downloading, run the EXE file and hit Browse to select a location (such as the Desktop, or Documents). Click Unzip, then browse to the new location, and double-click Kingston Format Utility.exe.
This will run the app; all you need to do now is select the Device and File system from the drop-down menus. Click Format when you’re ready, then wait.
Download: Kingston Format Utility (Free)
Is the USB Drive Write Protected or Corrupted?
Before proceeding, take the time to make sure that the drive is genuinely write protected. A couple of other issues could be coming into play here.- Your PC’s USB port is defective or blown entirely. Fixing a damaged USB port can be tricky but not impossible.
- The flash drive is corrupt. Whether you’re using a full USB flash stick or USB SD card adapter, problems with the device can occur. These steps will help you fix a corrupted flash drive.
How to Remove USB Write Protection With Diskpart
Before starting, insert your pendrive into your computer’s USB port.Windows has a built-in disk partition management tool called Diskpart. You can open this by hitting Windows key + R, entering cmd, then hitting Enter.
User Access Control will prompt you to confirm the action. Click Yes to continue.
You should now see CMD, the command line tool. At the prompt, enter
<br />diskpart<br /><br />A new command line window will open, with a new DISKPART prompt. It’s time to see which disks are attached to your computer:<br />list diskThe resulting table will list the currently available devices. But which is your USB drive?
Disk 0 will be your computer’s system drive. This is the one that Windows is installed on. If you have multiple partitions, these will be sequentially numbered. Note that the size is displayed for each disk.
With a USB flash device connected, (which will be Disk 1 or higher) you should be able to identify it by its comparatively low capacity.
In the image above, while Disk 0 is 119GB and Disk 1 931GB (two partitions of the same drive), Disk 2 is 16GB.
Therefore, Disk 2 is the USB flash drive. You should be able to check the capacity on the device itself, as this is usually printed on a drive’s casing. If not, you’ll be able to confirm it in Windows Explorer.
Select the Right Disk!
Before proceeding further, be absolutely certain that you have identified the USB pendrive. Note also that USB flash drives can be as high as 1TB in capacity at the time of writing, which could be larger than your computer’s HDD. Making the effort to be totally certain at this stage is vital to the integrity of the data on your computerOnce you’re certain, it’s time to select the disk. In our example, that means entering
select disk 2This will be confirmed with the message that disk 2 is now the selected disk. Next, request attributes:attributes diskVarious information will be displayed. Check the first line. This is the Current Read-only State. If you’re unable to write to the disk or reformat it, then Current Read-only State will be set to Yes.
You can easily remove the write protection on your pendrive with the command
attributes disk clear readonlyIf successful confirmation of the step will be displayed with the message “Disk attributes cleared successfully.”
Happy to lose the data on the USB flash drive? You can format the drive using diskpart’s clean command. First, ensure the disk is selected:
select disk 2 cleanYou can then create and format a partition:
create partition primary format fs=ntfsWait for this to complete—you should now have a fully working and formatted USB flash drive!
Check the write-only status of the drive by copying a small file.
Didn’t Work? USB Formatting Utilities to Try
Below are two free tools for formatting your USB drive in the event of a write protect error. These can be used in addition to, or instead of, Diskpart. Useful if you don’t like getting your hands dirty with the command line!1. SD Formatter
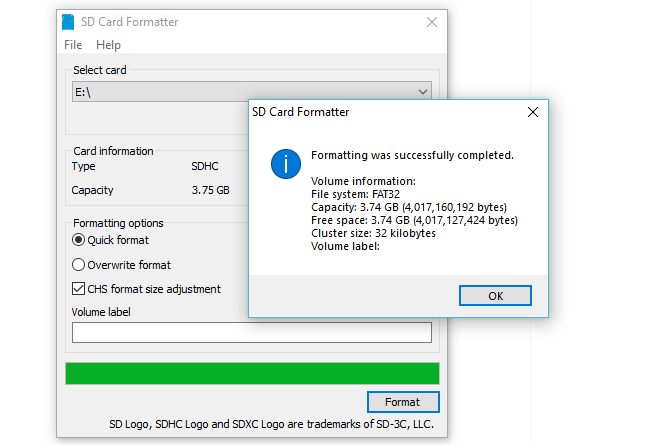
Number one on your list should be the SD Formatter tool from the SD Association. Although clearly intended for SD cards, the tool is compatible with USB flash sticks. After all, A USB flash stick is basically an SD card wired to a USB interface.
Simply connect the device, select the drive and a formatting option, and click Format.
Download: SDFormatter (Free)
2. Kingston Format Utility
Intended for older Windows systems (Windows XP to Windows 7), the Kingston Format Utility is ideal for USB flash devices from Kingston.Note that this has a slightly archaic method of installation. After downloading, run the EXE file and hit Browse to select a location (such as the Desktop, or Documents). Click Unzip, then browse to the new location, and double-click Kingston Format Utility.exe.
This will run the app; all you need to do now is select the Device and File system from the drop-down menus. Click Format when you’re ready, then wait.
Download: Kingston Format Utility (Free)